Heroku
The following tutorial will set you up with the tools you need to work with the Salesforce Lightning Design System 1 in your local development environment and deploy to Heroku.
If you’re interested in a more in-depth tutorial check out Christophe Coenraets’ GitHub project. His project is a reference application built with the Salesforce Lightning Design System, React, Node, Postgres, and Heroku. For a static example, please continue with the steps below!
In this tutorial, we’ll assume that you have some knowledge of the following:
Step 1: Initialize your project
Once you’ve downloaded and installed all the necessaries for your environment, create a folder for your project.
$ mkdir demo_slds_heroku
$ cd demo_slds_heroku
Inside of your demo_slds_heroku/ folder, create a package.json.
$ npm initYou will get a few prompts. The only prompt that we will update here is the entry point. The new entry point will be server.js instead of index.js.
name:
version:
description:
entry point: (index.js) [server.js]
test command:
git repository:
keywords:
author:
license: (ISC)
A package.json document will be created inside your demo_slds_heroku/ folder and the contents should look similar to the following:
{
  "name": "demo_slds_heroku",
  "version": "0.0.0",
  "description": "demo_slds_heroku",
  "main": "server.js",
  "scripts": {
    "test": "echo \"Error: no test specified\" && exit 1"
  },
  "author": "",
  "license": "ISC"
}
Step 2: Install node dependencies - Express
Use npm to install Express. While in your project folder, install express via npm.
$ npm install express --saveYou should now have a folder called node_modules/express/
Step 3: Create public/index.html
$ mkdir public
$ touch public/index.html
Copy the following markup into public/index.html:
<!DOCTYPE html>
<html lang="en">
  <head>
    <meta charset="utf-8" />
    <meta http-equiv="x-ua-compatible" content="ie=edge" />
    <meta name="viewport" content="width=device-width, initial-scale=1" />
    <title>Playground</title>
  </head>
  <body>
    Kaixo!
  </body>
</html>
Step 4: Create server.js
$ touch server.jsCopy the following code into server.js. Make sure you are in the root of your project (not your /public folder!):
var express = require('express');
var app = express();
var port = process.env.PORT || 8080;

// Serve static files
app.use(express.static(__dirname + '/public'));

// Serve your app
console.log('Served: http://localhost:' + port);
app.listen(port);
Sanity Checkpoint: Run node server.js in your terminal and your project will be served on http://localhost:8080/. You may also run npm run start as it will yield the same results.

Step 5: Download the Salesforce Lightning Design System 1
Download the Salesforce Lightning Design System 1 CSS framework
Once you unzip the CSS framework, you need to move a few things into the correct location. Grab the assets/ folder and put it in your demo_slds_heroku/public/ folder. Your project should have a similar file structure to the following:
demo_slds_heroku/
  public/
    assets/
      fonts/
      icons/
      images/
      styles/
    index.html
  node_modules/
    express/
  package.json
  server.js
Step 6: Add components
Add Salesforce Lightning Design System 1 styles to your public/index.html page by adding the following underneath the title tags:
<link rel="stylesheet" type="text/css" href="/assets/styles/salesforce-lightning-design-system.css" />Your public/index.html file should look similar to the following:
<!DOCTYPE html>
<html lang="en">
  <head>
    <meta charset="utf-8" />
    <meta http-equiv="x-ua-compatible" content="ie=edge" />
    <meta name="viewport" content="width=device-width, initial-scale=1" />
    <title>Playground</title>
    <link rel="stylesheet" type="text/css" href="/assets/styles/salesforce-lightning-design-system.css" />
  </head>
  <body>
    Kaixo!
  </body>
</html>
Sanity Checkpoint: You will notice that when you refresh your localhost the font will change!
A. Use the Grid System Component (Order)
Replace the text inside the body tags with the following. You can find the markup on the Grid System component page.
<div className="slds-grid slds-wrap">
  <nav className="slds-col slds-size_1-of-1">
    Page Header Component
  </nav>
  <main className="slds-col slds-size_1-of-2">
    Image
  </main>
  <aside className="slds-col slds-size_1-of-2">
    Tab Component
  </aside>
  <section className="slds-col slds-size_1-of-1">
    Card Component
  </section>
</div>
Your public/index.html file should look like the following:
<!DOCTYPE html>
<html lang="en">
  <head>
    <meta charset="utf-8" />
    <meta http-equiv="x-ua-compatible" content="ie=edge" />
    <meta name="viewport" content="width=device-width, initial-scale=1" />
    <title>Playground</title>
    <link rel="stylesheet" type="text/css" href="/assets/styles/salesforce-lightning-design-system.css" />
  </head>
  <body>

    <div className="slds-grid slds-wrap">
      <nav className="slds-col slds-size_1-of-1">
        Page Header Component
      </nav>
      <main className="slds-col slds-size_1-of-2">
        Image
      </main>
      <aside className="slds-col slds-size_1-of-2">
        Tab Component
      </aside>
      <nav className="slds-col slds-size_1-of-1">
        Card Component
      </nav>
    </div>

  </body>
</html>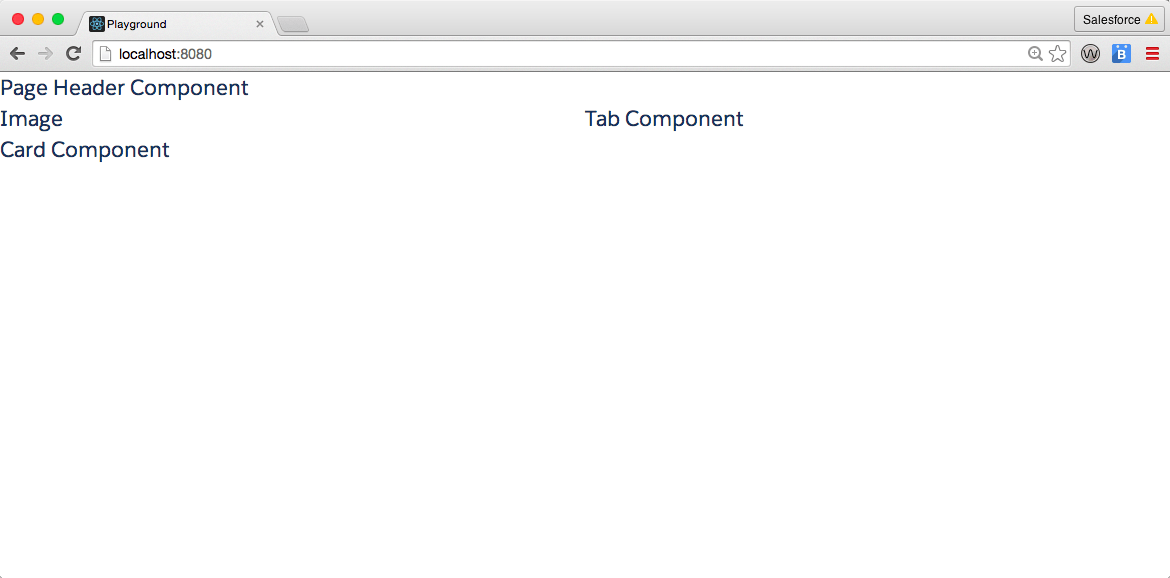
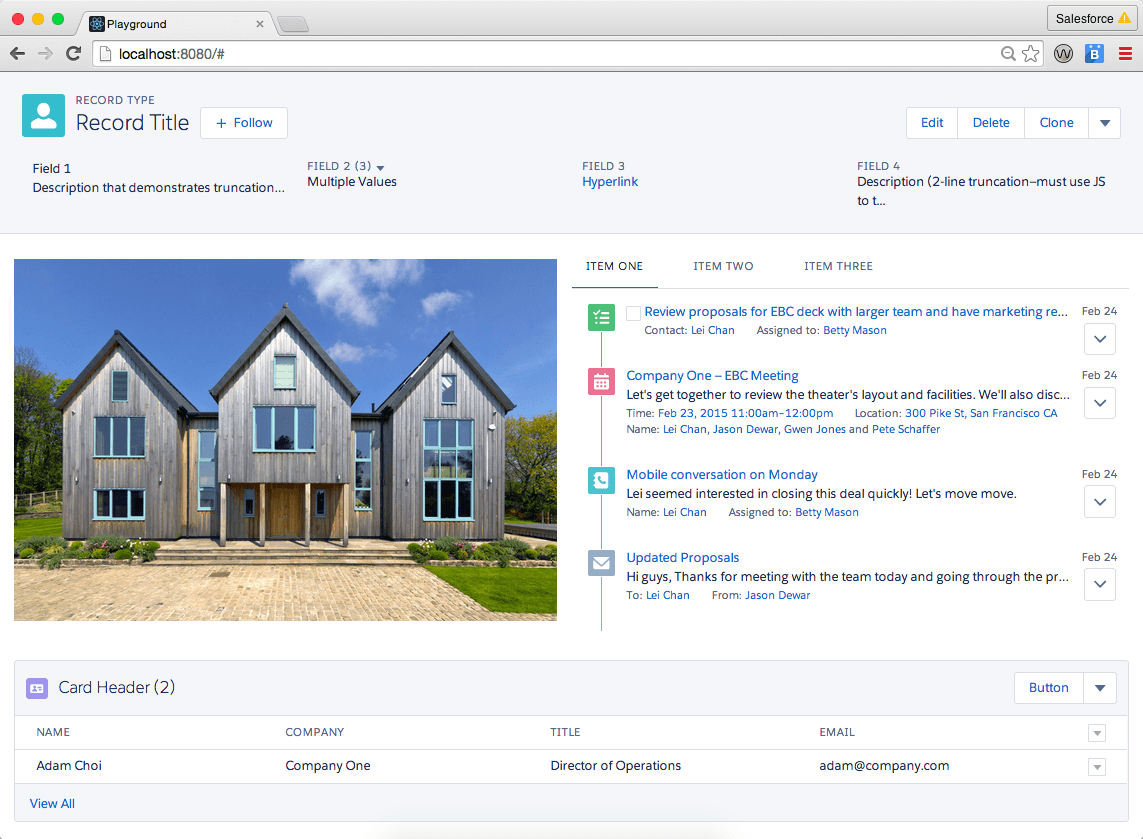
B. Use the Page Header Component (Record-Home)
Swap the text Page Header Component with the markup from the example on the Page Header component page.
C. Add a Fun Image
Swap the text Image with an image.
<img src="https://s3-us-west-1.amazonaws.com/sfdc-demo/realty/house08.jpg" alt="Cool house." />D. Use the Tabs Component
Swap the text Tab Component with the markup from the example on the Tabs component page
E. Use the Activity Timeline Component
Swap the H2 tags and its contents Item One Content with the markup from the example on the Activity Timeline component page.
F. Use the Card Component (Related List With Table)
Swap the text Card Component with the markup from the example on the Card component page.
G. Things are looking kind of squashed!
If you feel kind of cramped, check out the Utilities page for padding classes.
Step 7: Deploy to Heroku
Lets create a Heroku `Procfile` file. In the root of your demo_slds_heroku/ project make a Procfile file.
$ touch ProcfileThe contents of your Procfile file (yes, no filetype!) should be the following:
web: node server.jsLog into your Heroku account.
$ heroku login
Email: [your@email.com]
Password: [typing will be hidden]

$ git init
$ heroku create [name-of-your-project]
You should see the following information in your console.
Creating [name-of-your-project]... done, stack is cedar-14
https://[name-of-your-project].herokuapp.com/ | https://git.heroku.com/[name-of-your-project]git
Sanity Checkpoint: Run git remote -v in your terminal to check that the heroku remote was added.
Commit and push to Heroku.
$ git add .
$ git commit -m "Initial commit"
$ git push heroku master
Check out your project!
$ heroku openCongrats! You now have a static application!
Now that you have a static project using the Salesforce Lightning Design System and Heroku you can use it with any framework, add a database to it, whatever! The world is your oyster!